Soooo it's been a while and a good bit has been happening behind the scenes for those not following on IG/FB. Normally I'm better about taking pics and posting progress but it just didn't happen well this time. For those that care and like a story, here is the run through of where we are today.
Last you saw, the AC was removed and like most of you that know me, I couldn't just go for the cheap $30 A/C delete pulley nor the "backyard fab" accessory bracket for that slick low mount style. No I had to go for the pricey pulley set machined from billet to serve my needs and lighten my wallet.
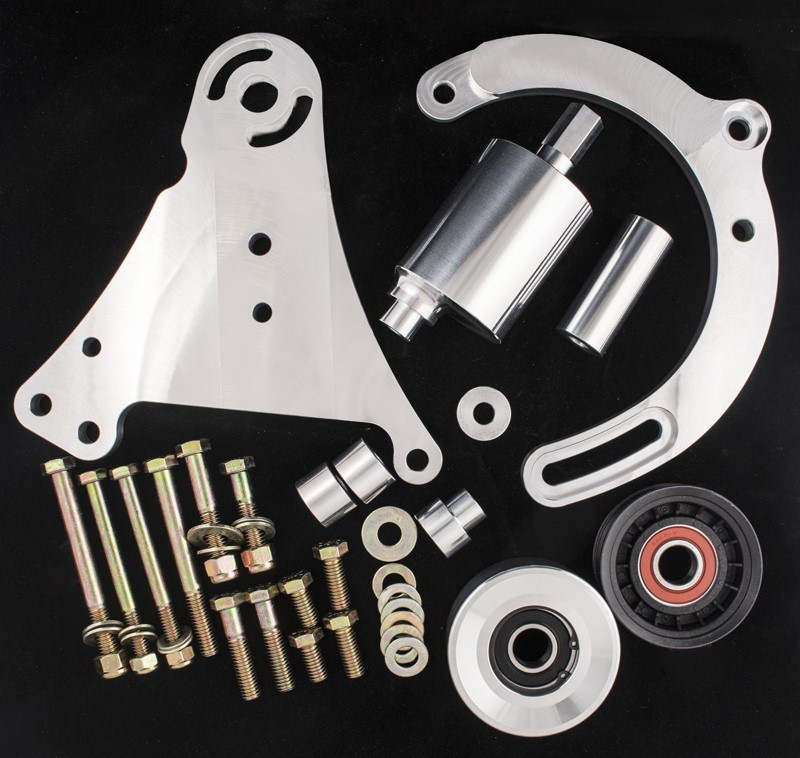
I didn't like how the power steering pump pulley looked so this little gem got the nod as well.

I then ventured off into buying a bunch of heavy welding wire cable, crimping/cutting tools, eyelets, etc to finalize the connections throughout the car. As you may recall, Adam was kind enough to help run the main wires through the interior and Kirk swung up for half an evening to get the relocated battery box in it's final resting place along with the cutoff switch. Adam's idea of trying to mount the switch so that the rod would go through the trunk key lock panned out very well so that's what we did. Kirk machined the rod to the appropriate length so that all came out great.


Since all the big decisions were made, most of the rest of the work was up to me due to schedule conflicts and other more important life events.
Exhaust:
When Smash was here, the headers came out fairly easy on the drivers side but the passenger side was a bitch. I decided since I was doing this solo, I would start on the hard side so as not to end up tired and frustrated when I needed my sanity and energy the most. Well that didn't go as planned. The passenger side went in fairly well but the drivers side was a fight. I can't remember a time I was more angry and frustrated. During my attempt to install it, I managed to wedge it into a position that I swore would require something to be cut. After calming myself down more times than I care to mention, I somehow got it free and didn't destroy the coating in the process. I managed to get the header in with some painters tape and persuasion however the oil filter took a good hit and needed to be replaced.
Sweaty and very tired, I look up at the oil filter and have no idea why I'm seeing a K&N unit with the stupid nut at the bottom. I swore off of these after my last issue with the dumb nut but I guess the inner cheap in me made me use one I probably had in stock. I took my time and was careful but sure enough, the nut stripped so I was in for another fight. That battle ended the same evening but in the end, I was pretty shocked I got these things done.
Next came the y-pipe which was thankfully straightforward in getting some fresh gaskets and RTV high temp on the tail end.

 Battery/Wiring:
As mentioned, Kirk helped get the position of everything finalized which was a huge help. He installed the power/ground jump leads on the bottom of the car so should I have an issue with the battery, I can get the vehicle power/started or just get the damn trunk open. Remember this is a vert and I'm a husky gentleman so slipping through the area into the trunk with cables won't be fun or possible.

Next you will see where the cutoff switch was mounted under the trunk lid release.

Next we have the almost finished product. I removed the CD changer and rescued the mix CD's I had in there for future.


Now I know what you may say....but Brian, where did your subs go. Don't worry, I will be finding a way to get at least one sub back in the trunk. I am likely just going to cut the box and recarpet it so it fits between the battery and other side of the trunk well.
Finished switch rod

For now, I'm keeping it in and can easily unscrew it when not at the racetrack. I want to get something nice to plug the hole when not in use.
Adam came up and helped finalize some of the wire connections up front since I was generally gun shy about making the final cuts. He did a great job replacing the power block with a new one hidden in the fender well. I didn't get a pic of it before installing the fender line and for that I'm sorry.
We were hopefully of getting a first re-start on this day but as I was tightening the nut for the starter power post, I heard a couple small cracks. I didn't realize what it was until things got very loose.

I debated ordering a new starter or replacing just the solenoid. A new one was only a little over $100 so I figured why not. The new Amazon Delco professional unit arrived and was nearly outside the box. They decided to ship it in the OE box which wasn't fit for transport. While it looked generally OK, I wasn't happy. A couple phone calls later and I got a refund plus they didn't want it back....OK sure!
Since my OG starter worked fine minus the new window, Smash said why not swap the solenoid. A few stubborn bolts later on the new unit and some grinding for access and I had it off. The starter was now in and secured but required a bit too many spacers for my liking due to the new big cables.

I connected new grounds in the front of the car and utilized existing holes in the block and the sway bar mounts that no longer had any use. For the rear, holes were drilled in the framerail but later they received welded studs for a nice secure connection.
Accessory Bracket:
No instructions were included so I was looking at a bag of various hardware, different length bolts, washers, etc. This was definitely one of those install it and redo things as you go situation. Eventually everything found there home and I really love the look and access provided. A friend on Facebook with the same setup provide a ton of helpful pics which were invaluable to shortening the install process.


Everything looked pretty well lined up but that wasn't the case. The crank pulley sits just a bit out from everything (always has) so when Adam came up, he helped me add spacers to the bracket. Now all is well.
There are many other things I will include in another post, include a weird starting issue, but its Friday and Miller time.
Here are some pics to take you into the weekend.


And most importantly....
