Today's Posts Mark Forums Read Calendar
Go Back   NJFBOA - Home of New Jersey's Camaros and Firebirds > Tech Forums > Brake, Chassis and Suspension Tech

Notices


Reply
 
Thread Tools
Old 11-19-2009, 11:38 PM   #1
IROCZman15
10 Second Club / Meet Coordinator
 
IROCZman15's Avatar
 
Join Date: Dec 2004
Location: Roxbury, NJ
Posts: 2,101
iTrader: (8)
new subframe and rust repair, lots of photos

well, my winter project is to tackle the rust on the car and redo all of the stock-old undercoating underneath. i began by pulling up the carpet, after taking out the seats, center console, radio, moving wires, etc. i looked around online, carpets for the pass cabin go for under $200, so i think i'll scrap this 23 year old carpet for a new one...


looking at the floor pans i noticed that everywhere is rust free in the car, EXCEPT THE DRIVERS SIDE FLOORPAN AND KICK PANEL AREA. damn. i knew i had to attack it now before it spreads.


this is what i found/knew was there..


while working here on a cooold day


so since i dont have a plasma cutter or mig welder and wanted this done right.. i brough it to PRO FAB CHASSIS located in whitehouse station NJ.. 5 mins off fof RT 78. www.profabchassis.com 908-591-3087 ..they build race cars mostly and work on these cars often too

i asked them to weld in my alston racing subframe connectors.. which can be seen in the above photo.. because i had them only bolted in. i also wanted to run a second set of sfc's along the rockers (spohn, bmr, or umi type).. the guys at pro-fab know their stuff and they recomended i go with a S&W suspension kit for subframe connectors....

..the S&W kit comes with a few extra pipes that weld to the rockers, a few plates that bolt through the floorpans for extra support, and a crossmember support. the kit is designed to be used with the S&W adjustable torque arm, so we ordered that, and this allowed me to run a driveshaft safety loop up there too so the car wont po-go stick if the front u joint fails.

below are the pics of the welded up and bolted S&W kit. it feels very tight. please excuse the underside of the car, its oily and nasty looking... FOR NOW!! in the next 3 months i will be wire-wheeling and sanding down the old undercoating, cleaning off the old oil-spray and redoing the undercoating after a rust-treatment of POR-15. THEN it will look good. maybe a new cat back and an adjustable panhard bar with lca's too.

pics:


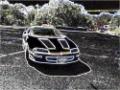
saw this 2010 on the way home


quick pics of other projects they have going..


the car felt TIGHT. after a few miles of driving already, i highly recomend the S&W subframe kit.

if anyone wants my old Alston Racing SFC's they can be for sale!

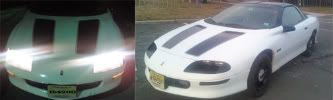
heres 2 quick photos of the areas where the rust was cut out, sheetmetal was welded in, with seamsealer, and some temporary paint. the bare metal spots nearby will be sanded down a bit more, then rustproofed and covered


__________________
1987 IROC-Z - modified


Last edited by IROCZman15; 11-19-2009 at 11:40 PM.
IROCZman15 is offline   Reply With Quote
Old 11-19-2009, 11:40 PM   #2
Anti_Rice_Guy
The Mayor / 2009 Member of the Year / Moderator
 
Anti_Rice_Guy's Avatar
 
Join Date: Jan 2005
Location: Northwest
Posts: 8,859
iTrader: (1)
Social Networks:

Looks great Dave!
__________________
1995 Z28 Convertible A4 13.78 @ 100 (CAI, high flow cat, catback, 160 thermo, hypertech, Strano springs, Koni yellows, sway bars, 3 pt. UMI SFC)
2018 Sea Doo GTX - 3 cylinders and das boooooost
Quote:
Originally Posted by BonzoHansen View Post
Is English your 2nd language? Did you graduate high school? Your posts make my head hurt.
Team FARM
Anti_Rice_Guy is offline   Reply With Quote
Old 11-20-2009, 06:30 AM   #3
CHRIS67
 
CHRIS67's Avatar
 
Join Date: Jul 2008
Location: Columbia
Posts: 928
iTrader: (0)
Nice job.
__________________


Praise the Lowered

67' Camaro - Worked 327, Hotchkis TVS suspension, 4 wheel cross drilled discs, AM radio FTL
05' Silverado - Stock, stock, and stock.
CHRIS67 is offline   Reply With Quote
Old 11-20-2009, 10:45 PM   #4
LTb1ow
Mongo the Meet Coordinator
 
LTb1ow's Avatar
 
Join Date: May 2008
Posts: 16,896
iTrader: (8)
The underside of your car is quite busy!

Damn.


Looks good!
__________________
Quote:
Originally Posted by KirkEvil View Post
repo bigals turd gen and part it out to a loving home
LTb1ow is offline   Reply With Quote
Old 11-20-2009, 10:55 PM   #5
ib4200
 
ib4200's Avatar
 
Join Date: Feb 2009
Location: bridgewater
Posts: 868
iTrader: (1)
good thing you found that rust, taking good care of the car as usual
__________________


Quote:
Originally Posted by BigAls87Z28 View Post
its an ongoing joke between the Geo Storm crew and the Sebring coupe team.
bolt-ons and a bed n' breakfast
ib4200 is offline   Reply With Quote
Old 11-21-2009, 05:11 PM   #6
Teds89IROC
 
Teds89IROC's Avatar
 
Join Date: Sep 2004
Location: Haledon, NJ
Posts: 5,162
iTrader: (0)
looks great! I have a similar project lined up but my rot is behind the fenders on the inner rocker panels.
__________________
1989 IROC-Z 355 LT1 T56 Swapped
2016 Chevy Colorado LT 3.6 v6
2008 Jeep Grand Cherokee Laredo 4.7L RIP 12/29/2016
1998 Honda CBR 600F3
2003 Yamaha FX140
Teds89IROC is offline   Reply With Quote
Old 11-22-2009, 06:54 PM   #7
andy78TA
 
andy78TA's Avatar
 
Join Date: Nov 2009
Posts: 201
iTrader: (0)
Do you mind if I ask you how much they charged you to weld on the subframe connectors? I was just talking on another post on how I was going to order new solid bushings, g braces and subframe connectors but did not know of any place that would weld them in for me. I happen to live 10 minutes from whitehouse station though haha.
__________________
78 Trans Am--Pontiac 400-custom headers-pypes 2.5 X system-edelbrock intake and carb, pro comp roller rockers custom brackets-head work-custom sound system - recaro interior
andy78TA is offline   Reply With Quote
Old 11-23-2009, 09:31 PM   #8
IROCZman15
10 Second Club / Meet Coordinator
 
IROCZman15's Avatar
 
Join Date: Dec 2004
Location: Roxbury, NJ
Posts: 2,101
iTrader: (8)
pm sent on the price
__________________
1987 IROC-Z - modified

IROCZman15 is offline   Reply With Quote
Old 11-25-2009, 06:43 PM   #9
andy78TA
 
andy78TA's Avatar
 
Join Date: Nov 2009
Posts: 201
iTrader: (0)
got your PM, thanks for the info
__________________
78 Trans Am--Pontiac 400-custom headers-pypes 2.5 X system-edelbrock intake and carb, pro comp roller rockers custom brackets-head work-custom sound system - recaro interior
andy78TA is offline   Reply With Quote
Old 12-01-2009, 07:38 AM   #10
HardcoreZ28
 
HardcoreZ28's Avatar
 
Join Date: Aug 2004
Location: Hillsborough, NJ
Posts: 2,630
iTrader: (1)
Wow that is one heck of an undercar setup. Just out of curiousity what kind of power are you making with that thing? Will ground clearance be an issue with that piece that crosses under the exhaust pipe?

Oh and a few tips on the rest of your preservation of the floor pans. A wire wheels will likely take you FOREVER to remove old undercoating. Try a heat gun and a scraper wherever you can....it'll go much quicker. Then when you POR it make sure there's something for the paint to bite onto or it'll eventually peel off in sheets. And if you don't mind changing the color of the floor pan...I'd scuff the inside and POR that too so the metal is completely sandwiched. Did that with my car and I still have zero rust on the underside.
__________________
--==RPM Resto & Custom==--

1989 IROC-Z Media Coverage:
Chevy High Performance - Readers Rides 4/03
GM High Tech Performance - Tech Article 3/06
Chevy Rumble - Tech & Feature Articles November 2006
Auto Restorer Magazine - Feature Article 5/11
SkinAndSteel.com
HardcoreZ28 is offline   Reply With Quote
Old 12-01-2009, 09:57 AM   #11
WildBillyT
Ayatollah of Rock N Rolla / Admin
 
WildBillyT's Avatar
 
Join Date: Mar 2006
Location: Parts Unknown
Posts: 12,573
iTrader: (10)
Quote:
Originally Posted by HardcoreZ28 View Post
Wow that is one heck of an undercar setup. Just out of curiousity what kind of power are you making with that thing? Will ground clearance be an issue with that piece that crosses under the exhaust pipe?

Oh and a few tips on the rest of your preservation of the floor pans. A wire wheels will likely take you FOREVER to remove old undercoating. Try a heat gun and a scraper wherever you can....it'll go much quicker. Then when you POR it make sure there's something for the paint to bite onto or it'll eventually peel off in sheets. And if you don't mind changing the color of the floor pan...I'd scuff the inside and POR that too so the metal is completely sandwiched. Did that with my car and I still have zero rust on the underside.
This is spot on and great advice (not surprised with it coming from Paul).

Do not bother with a wire wheel. At first you will zip through the undercoating and think you are doing great. Then when the wire wheel loads up in around 30 seconds you'll reach for your heat gun. Been there, done that.
WildBillyT is offline   Reply With Quote
Old 12-02-2009, 11:58 PM   #12
IROCZman15
10 Second Club / Meet Coordinator
 
IROCZman15's Avatar
 
Join Date: Dec 2004
Location: Roxbury, NJ
Posts: 2,101
iTrader: (8)
awesome, thanks hardcore and wildbilly..

from looking at the car on the ground. it looks like the crossmember below the tq arm and driveshaft loop is the lowest part. it looks about 1"or so lower than anything else important. what i mean byy important...is the lowest part of the car is the air-dam up front.. very low. . i hope the x-member not too big of a deal for ground clearance since the front is on 2" drop spindles and the rear on cut moog springs. i'll measure it's height off the ground one day soon and let u know if ur still interested.

as for power. i have to be honest. not too much. its a replacement long block from gmpp. about 7 years old too, with the stock tpi setup. the long block is a step below the gmpp zz4 motor, and that puts out about 350 hp 350 tq . mine was quoted around 310 hp at the flywheel, so maybe 275 if im lucky at the wheels after driveline loss. but the headers, exhaust, and air induction may add another 10 or so on top of it. future plans are for a small 100 or 125 shot of nitrous.. then to yank this motor and throw in a 383 with a reasonable procharger/vortech/paxton/etc...or if i decide i like the nitrous ill pump it into the 383...goimg to sta with a small block most likley tho.


i will prob use that heat gun and scraper method. i read about it on thirdgen as well. iw as planning on doing both. it'll be a messy project, but a necessary one. i was planning to use the por15 or some type of paint on the inside of the floor to seal off the metal as well. which orignally is why i thought a wire wheel would be good b/c it would open up the bare metal and paint would stick better than just scraping it off. thx for the advice guys. ill post progress pics in a few weeks. havent started it yet


Quote:
Originally Posted by HardcoreZ28 View Post
Wow that is one heck of an undercar setup. Just out of curiousity what kind of power are you making with that thing? Will ground clearance be an issue with that piece that crosses under the exhaust pipe?

Oh and a few tips on the rest of your preservation of the floor pans. A wire wheels will likely take you FOREVER to remove old undercoating. Try a heat gun and a scraper wherever you can....it'll go much quicker. Then when you POR it make sure there's something for the paint to bite onto or it'll eventually peel off in sheets. And if you don't mind changing the color of the floor pan...I'd scuff the inside and POR that too so the metal is completely sandwiched. Did that with my car and I still have zero rust on the underside.
__________________
1987 IROC-Z - modified


Last edited by IROCZman15; 12-03-2009 at 12:10 AM.
IROCZman15 is offline   Reply With Quote
Old 12-03-2009, 07:04 AM   #13
HardcoreZ28
 
HardcoreZ28's Avatar
 
Join Date: Aug 2004
Location: Hillsborough, NJ
Posts: 2,630
iTrader: (1)
Sounds like a good plan all around and the extra bracing will pay off when you upgrade the engine setup.
For the undercoat removal...take off as much as you can with the scraper and heat gun...then you can use a rag soaked with kerosene, gasoline, or brakleen to remove the light stuff that's still on. Just don't go back at it with heat while there are fumes are residue around.

Oh and wear a hat and goggles when you're doing the job. Melted undercoating is hot and sticks to your hair....and if you get POR on your face it could take a couple days for it to come off....been there and done that.
__________________
--==RPM Resto & Custom==--

1989 IROC-Z Media Coverage:
Chevy High Performance - Readers Rides 4/03
GM High Tech Performance - Tech Article 3/06
Chevy Rumble - Tech & Feature Articles November 2006
Auto Restorer Magazine - Feature Article 5/11
SkinAndSteel.com
HardcoreZ28 is offline   Reply With Quote
Old 12-03-2009, 08:22 AM   #14
WildBillyT
Ayatollah of Rock N Rolla / Admin
 
WildBillyT's Avatar
 
Join Date: Mar 2006
Location: Parts Unknown
Posts: 12,573
iTrader: (10)
Quote:
Originally Posted by 87IROCmadman View Post
awesome, thanks hardcore and wildbilly..

from looking at the car on the ground. it looks like the crossmember below the tq arm and driveshaft loop is the lowest part. it looks about 1"or so lower than anything else important. what i mean byy important...is the lowest part of the car is the air-dam up front.. very low. . i hope the x-member not too big of a deal for ground clearance since the front is on 2" drop spindles and the rear on cut moog springs. i'll measure it's height off the ground one day soon and let u know if ur still interested.

as for power. i have to be honest. not too much. its a replacement long block from gmpp. about 7 years old too, with the stock tpi setup. the long block is a step below the gmpp zz4 motor, and that puts out about 350 hp 350 tq . mine was quoted around 310 hp at the flywheel, so maybe 275 if im lucky at the wheels after driveline loss. but the headers, exhaust, and air induction may add another 10 or so on top of it. future plans are for a small 100 or 125 shot of nitrous.. then to yank this motor and throw in a 383 with a reasonable procharger/vortech/paxton/etc...or if i decide i like the nitrous ill pump it into the 383...goimg to sta with a small block most likley tho.


i will prob use that heat gun and scraper method. i read about it on thirdgen as well. iw as planning on doing both. it'll be a messy project, but a necessary one. i was planning to use the por15 or some type of paint on the inside of the floor to seal off the metal as well. which orignally is why i thought a wire wheel would be good b/c it would open up the bare metal and paint would stick better than just scraping it off. thx for the advice guys. ill post progress pics in a few weeks. havent started it yet
Sounds good- but from my experience a wire wheel won't leave enough "tooth" for POR to stick to. It will peel off in small sheets. If you are going to wheel, use some sandpaper to rough it up afterward.
WildBillyT is offline   Reply With Quote
Reply

  NJFBOA - Home of New Jersey's Camaros and Firebirds > Tech Forums > Brake, Chassis and Suspension Tech


Posting Rules
You may not post new threads
You may not post replies
You may not post attachments
You may not edit your posts

BB code is On
Smilies are On
[IMG] code is On
HTML code is Off

Forum Jump

» Sponsor List


All times are GMT -5. The time now is 03:56 PM.


Powered by vBulletin® Version 3.8.11
Copyright ©2000 - 2024, vBulletin Solutions Inc.