|
|
 05-29-2010, 09:43 AM
|
#51
|
|
Mongo the Meet Coordinator
Join Date: May 2008
Posts: 16,896
|
You got the main long bolt out right?
All teh exhaust is off?
I would try a pry bar to jar it loose.
__________________
Quote:
Originally Posted by KirkEvil

repo bigals turd gen and part it out to a loving home
|
|

|

|
|
05-29-2010, 01:35 PM
|
#52
|
Join Date: Apr 2009
Posts: 192
|
Alright...got the driver side motor mount replaced and the drivers side header in. I can't get the engine to line up right! The motor has shifted back and is hitting the one side of the mount...I remember this last time I jacked the motor up. I guess i'll just have to keep jacking/using a pry bar and hope to get it back to position.
Something I noticed is that the bolts for the header are rediculously close to each collector (I cant even fit a socket in there). I dont even think i'm going to be able to fit the stage 8 clips on them. Has anyone else had this problem?
What does everyone usually do about the master cylinder hydraulic line? Its basically touching the header and doesnt really have much slack to tie it out of the way...
Sorry for all the questions. Tough day to say the least haha.
|
|
|
|
|
05-29-2010, 08:12 PM
|
#53
|
|
Mongo the Meet Coordinator
Join Date: May 2008
Posts: 16,896
|
I used regular ole pacesetter supplied bolts, and as long as you keep an eye on em for a few heat cycles, they will stay tight after that.
__________________
Quote:
Originally Posted by KirkEvil
repo bigals turd gen and part it out to a loving home
|
|
|
|
|
|
05-30-2010, 09:27 AM
|
#54
|
|
Hippy Mod, Bergermeister Meisterberger, Moderator
Join Date: Aug 2004
Location: Ewing
Posts: 6,212
|
I had no problem with the Stage 8 bolts. Don't bother putting the clips on until you've gone through a couple of heat cycles and re-tightened them. You may need to file down some of the clips to get them on nice and tight.
__________________
69 Z28 JL8 4 wheel disc brakes - being restored
09 Silverado Z71
|
|
|
|
|
05-30-2010, 01:19 PM
|
#55
|
Join Date: Apr 2009
Posts: 192
|
Got the drivers side more or less complete (minus wires, plugs, etc).
I got the passenger side motor mount installed, and the header slipped into place. Once again, I can't get the motor mount to line up correcty. Everytime I lower the engine the side towards the front of the car always get stuck on the little tab of the ES motor mount insert. So frustrated right now....haha
The install was going fairly well, now i'm starting to curse and throw tools..
|
|
|
|
|
05-30-2010, 02:43 PM
|
#56
|
Join Date: Apr 2009
Posts: 192
|
Someone please help...i'm about ready to kill someone. 4 hours later and the damn motor mount is still hitting the tab on the ES insert. I have no idea what to do and my neighbors are beginning to think i'm crazy from all the yelling....
|
|
|
|
|
05-30-2010, 03:29 PM
|
#57
|
Join Date: Apr 2008
Location: Delran
Posts: 6,785
|
keep messing with it. you got the drivers side from playing with it, so keep at it. from what ive heard lt1 header install is not the simplest task in the world. dont give up youre almost there! ::thumbs up:: 
|
|
|
|
|
05-30-2010, 03:43 PM
|
#58
|
Join Date: Apr 2009
Posts: 192
|
Thats whats killing me, IM ALMOST THERE and this is holding me up haha. I loosed up the drivers side mount to see if I could get some play from that to help the passengers side line up, but no go....The mount that attaches to the motor just keeps hitting the tab on the ES insert....I need it to move about 1/8" but I just cant get it to budge (pry bar, jacking in different places, etc). I'm taking a break because i'm absolutely exhausted, and so frustrated that I think i'm just moving backwards at this point.
If anybody has any suggestions, please help 
|
|
|
|
|
05-30-2010, 04:28 PM
|
#59
|
Join Date: Apr 2008
Location: Delran
Posts: 6,785
|
do you have room to get a small rolling tip pry bar in through half of the pedestal/mount and slip the bolt through the other side to get it in???

|
|
|
|
|
05-30-2010, 04:49 PM
|
#60
|
Join Date: Apr 2009
Posts: 192
|
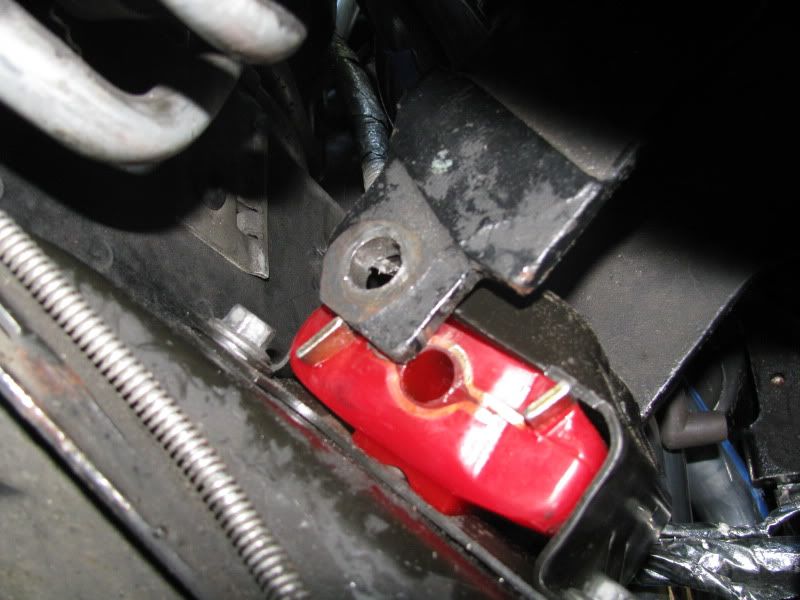
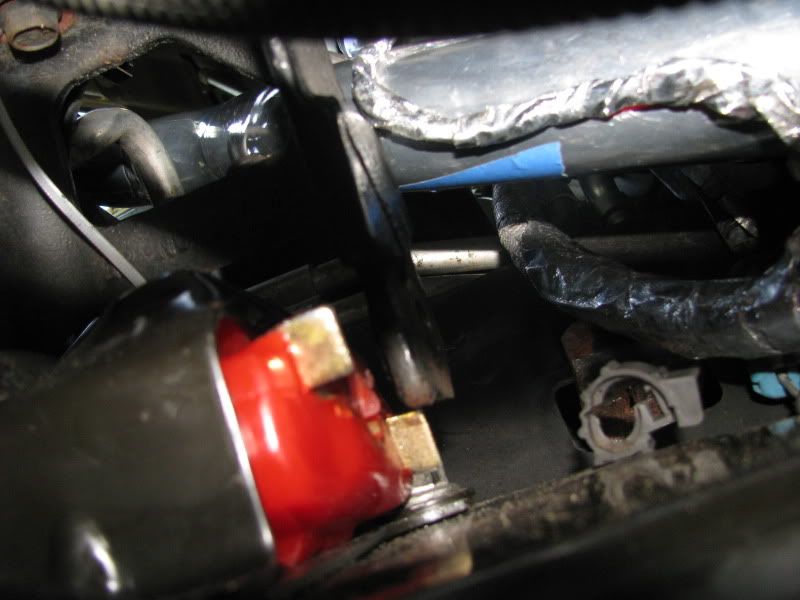
Heres pictures of what i'm dealing with. If I could just get it over that tab on the insert....I dont know if things got shifted or if the tab is just in the way....
|
|
|
|
|
05-30-2010, 05:01 PM
|
#61
|
Join Date: Apr 2008
Location: Delran
Posts: 6,785
|
anyway you can undo the clamshell from the kmember there to give it a little slack to drop down to get the tab over top, then jack it up to get the clamshells back in place and lower over top???
|
|
|
|
|
05-30-2010, 05:05 PM
|
#62
|
Join Date: Apr 2009
Posts: 192
|
hmm...didn't think about that.
So your saying unbolt the clamshell, lower the motor, and try to rejack the motor enough to install the clamshell?
|
|
|
|
|
05-30-2010, 05:18 PM
|
#63
|
Join Date: Apr 2008
Location: Delran
Posts: 6,785
|
well it looks like that gold tabs in your way. so what i was saying is try to drop the clamshell down under it, jack the motor up and over top to where it will clear then bring the clamshell back in place, without trying to force the motor past the gold tab move it over top the tab with the clamshell drooped down a bit.
|
|
|
|
|
05-30-2010, 06:04 PM
|
#64
|
Join Date: Apr 2009
Posts: 192
|
Alright i'll give that a try first thing in the morning...Was going to work on it a little more today, but i'm absolutely exhausted haha. Tough working in a gravel driveway...
|
|
|
|
|
05-30-2010, 06:27 PM
|
#65
|
|
Mongo the Meet Coordinator
Join Date: May 2008
Posts: 16,896
|
Take out the mount, grind that **** off.
__________________
Quote:
Originally Posted by KirkEvil
repo bigals turd gen and part it out to a loving home
|
|
|
|
|
|
05-30-2010, 06:31 PM
|
#66
|
Join Date: Apr 2009
Posts: 192
|
At one point, I was honestly thinking about it. What is the purpose of the tabs? I didn't want to cut it off and realize I ruined the mount...
|
|
|
|
|
05-30-2010, 08:11 PM
|
#67
|
|
Hippy Mod, Bergermeister Meisterberger, Moderator
Join Date: Aug 2004
Location: Ewing
Posts: 6,212
|
I think I ran into that same problem and had to unbolt the clamshell and move it to get the long bolt lined up and all the way through. Then trying to get the clamshell bolts tightened up was a pain with the mount installed. I'm pretty sure I ended up grinding something down to make it a little easier.
__________________
69 Z28 JL8 4 wheel disc brakes - being restored
09 Silverado Z71
|
|
|
|
|
05-31-2010, 10:47 AM
|
#68
|
Join Date: Apr 2009
Posts: 192
|
Well I ended up grinding the tabs down....It clears the tabs but I still can't get the thing to line up! At one point I got the bolt through the first side of the mount, but the other side wasnt even close.
How in the world did the engine get that much off? I would say the one side needs 1/4" to line up with the hole (you cant even see the hole no matter how you jack it. I've tried jacking it in different places and pulling/prying, but it just won't line up. Did I do something wrong with the mount or is the engine cocked? I have no idea what to do...I really can't get the damn thing to line up right
|
|
|
|
|
06-01-2010, 07:58 AM
|
#69
|
|
Hippy Mod, Bergermeister Meisterberger, Moderator
Join Date: Aug 2004
Location: Ewing
Posts: 6,212
|
Did you loosen up the driver's side to help give you more movement to line it up? I remember I had to go back and do that. I know it took me 4 weekends in Dec-Jan to get mine done in the garage. It was 38 degrees in the garage and hard to hold the tools. I also had to hacksaw some flange material off the trans but that's because it was a replacement trans from an Astro Van. Do you have anybody helping you?
__________________
69 Z28 JL8 4 wheel disc brakes - being restored
09 Silverado Z71
|
|
|
|
|
06-01-2010, 12:28 PM
|
#70
|
Join Date: Apr 2009
Posts: 192
|
Noone is helping me...just me in my rocky driveway haha. Sorry for asking so many questions, I dont have a ton of experience, so i'm trying to do all the projects myself to build my skills/confidence. I was hoping to get it done this past weekend because i'm not going to be able to go home from school for a few weeks now to work on it. Oh well, I tried my best to get it done haha.
Before I left, I was able to get the bolt 3/4 of the way through. The rear side of the mount is still off about 1/4". If I stuck a punch or something in the hole, I was able to twist the insert and get it to line up, but as soon as I let off pressure, the polyurethane insert would just twist back (I assumed it probably wasnt good to have it twisting like that anyways). Yes, I did end up loosening the drivers side mount in hopes of allowing for more movement. I guess i'm just going to have to keep playing with it to try to get it to line up. Its closer than it was when I started....I just cant believe it got that far off..
|
|
|
|
|
06-01-2010, 12:51 PM
|
#71
|
|
Mongo the Meet Coordinator
Join Date: May 2008
Posts: 16,896
|
Quote:
Originally Posted by SeanC
Noone is helping me...just me in my rocky driveway haha. Sorry for asking so many questions, I dont have a ton of experience, so i'm trying to do all the projects myself to build my skills/confidence. I was hoping to get it done this past weekend because i'm not going to be able to go home from school for a few weeks now to work on it. Oh well, I tried my best to get it done haha.
Before I left, I was able to get the bolt 3/4 of the way through. The rear side of the mount is still off about 1/4". If I stuck a punch or something in the hole, I was able to twist the insert and get it to line up, but as soon as I let off pressure, the polyurethane insert would just twist back (I assumed it probably wasnt good to have it twisting like that anyways). Yes, I did end up loosening the drivers side mount in hopes of allowing for more movement. I guess i'm just going to have to keep playing with it to try to get it to line up. Its closer than it was when I started....I just cant believe it got that far off..
|
First lesson learned, never expect an LT1 related project to go as planned. 
But you are getting there, just keep at it, sounds like you will have a fresh start later so you should be able to knock it out.
__________________
Quote:
Originally Posted by KirkEvil
repo bigals turd gen and part it out to a loving home
|
|
|
|
|
|
06-01-2010, 12:57 PM
|
#72
|
Join Date: Apr 2009
Posts: 192
|
Yeah i'm confident i'll get it done. Its definitly helpful walking away from it for a little while lol. Despite my difficulties with the motor mount, i'm pretty happy with how well i'm doing. Definitly feeling more confident working on Lt1s. When I first started, getting the exhaust manifold bolts/spark plugs out seemed physically impossible, now I can do it in under a few hours 
|
|
|
|
|
06-01-2010, 01:26 PM
|
#73
|
Join Date: Apr 2008
Location: Delran
Posts: 6,785
|
glad to see you getting it there....just keep working at it, you'll get it...especially after a fresh start...it'll give you time to calm down, get a bit more levelheaded and maybe have a few ideas of where you wanna start out when you get back to it.
|
|
|
|
|
06-01-2010, 03:09 PM
|
#74
|
Join Date: Apr 2009
Posts: 192
|
Thanks for the support guys. You have all been extremely helpful!
When I start the project up again i'll keep everyone updated, and hopefully post some pictures of the final product! I'm absolutely dying to here it run....
|
|
|
|
|
07-04-2010, 04:47 PM
|
#75
|
Join Date: Apr 2009
Posts: 192
|
So i'm getting fairly close to starting it up, got plugs and wires done (wires dont fit in the passengers side wire loom well...oh well)...I know people are going to think it was a dumb idea to get headers with AIR/EGR hookups, but unfortunately, thats what I did.
I tried to hook the AIR components to the headers, and the threads WILL NOT go on. They screw on to the old manifolds fine, but no matter what I do, won't go on to the new headers. I'm going to call pacesetter tomorrow and see if they are any help. Any ideas????
|
|
|
|
 Posting Rules
|
You may not post new threads
You may not post replies
You may not post attachments
You may not edit your posts
HTML code is Off
|
|
|
|
|
|