A good bit of progress, but nothing specifically exhaust related.
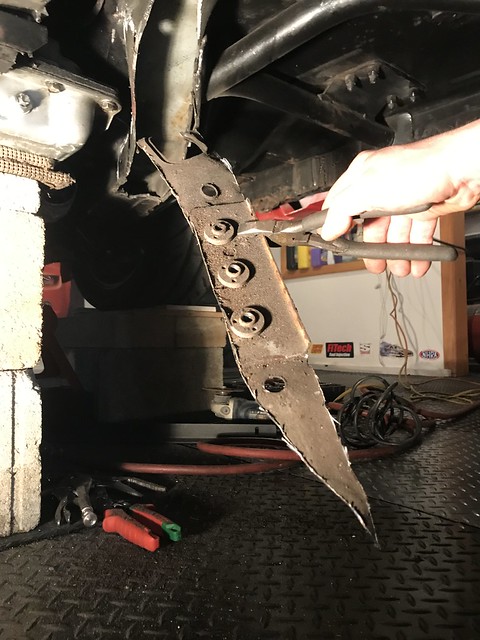
I think I mentioned above that I was going to have to get creative with routing the exhaust because I am UNWILLING to let my exhaust be the lowest component of the vehicle. I did not want the hassle of banging exhaust pipes closed-flat on a speed bump or pothole, or having welds crack, and throwing off oxygen sensor readings or the whole tune. I did not want to have to regularly repair exhaust damage or deal with the leaks, so I did what I had to do and made sacrifices to the oem sheetmetal/frame-rail under the car...specifically the passenger side. The stick-shift guys have it made when it comes to clearance between the transmission housing and the trans tunnel, but not for me with the bif 700r4 trans. Almost everyone who has a 700r and wants a 3" collectors settles on having them hang really low and passing almost "under the framerails" completely. Not something I was going to allow, I was determined to find a better way. So I took a different approach and cut out half of the "box' that made up the passenger side inner frame-rail along the trans tunnel. It is surprisingly thin metal just stamped, folded and spot welded... but it worked just fine for the stock chassis indeed. I kept the outside "rail" and then welded a series of 2"x2" pieces of angle iron to this edge and to the underside of the floor to retain rigidity in this area of the car. I then cut some flat plates of metal and lapped them over the angle iron and welded them to the angle iron and the floor sheetmetal where the oem frame had met the trans tunnel. My subframe connectors also connect to this part of the oem frame, and I boxed in the open area at the front which is near the firewall. My welds were decent, but the damn rubber based undercoating kept giving me problems despite me doing my best to scrape it all off. I used a heat-rated seam sealer on the welds, gaps, and any open areas, and while the seam sealer will serve a nice "sealing" purpose, it made the underside look messy and unsmooth. Once the seam sealer was cured, I painted over everything with VHT high heat engine enamel satin black paint. Not everyone might like my approach to this, but its my car and what I thought was the solution that would give me the most options of collector clearance. It is structurally sound, for sure.

-please remember, this cut out section of frame was reinforced, but I didn't get to take a picture of it before seam-sealer and paint.sorry
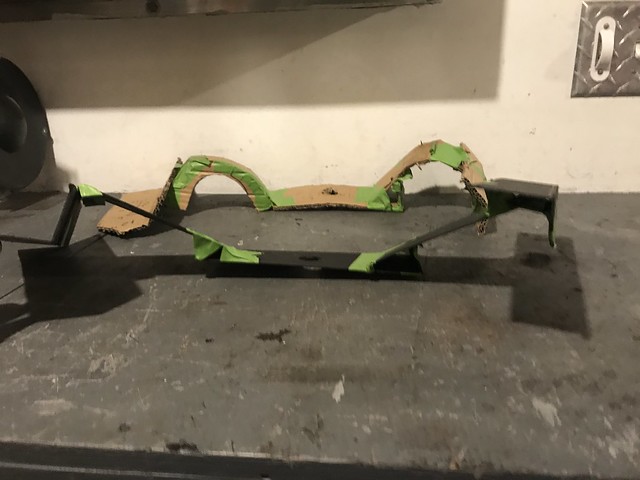
I did a whole lot of research on crossmembers, both on fbody sites, drag websites, unibody car stuff, etc. I saw some interesting stuff, and I knew that to get the fitment I was looking for, I would have to build one. The hooker trans crossmember and some others are ok, but each left a lot to be desired, and I knew I would regret buying something that didn't check all the boxes I required.....plus NONE would fit with the way I cut out half the passenger side's framerail.
So I was on my own. I came up with a cardboard design using arches, but it didn't seem feasible. I then designed one out of heavy card-stock and used the strength properties that come with triangles and angles to create a mock up. I got some scrap steel from work, some from home depot (which I didn't use and returned) and some from a local welding place for $20. In the end I used the 1.5" angle iron for the outer mounts, the 3" x 3/16" flat stock for the "arms" and some "gusset supports" and then the 3"x1" rectangle tube for the base. The trans tunnel of these cars is filled with weird angles and interesting geometry, which left my home-built trans mount not aesthetically symmetrical, but it is super strong. As I mentioned a week ago, I have always wanted to do away with the threaded-inserts that the factory used for mounting the trans crossmember. Three out of the four were previously stripped out and I had re-tapped them with a bigger thread size, but I was always unhappy about it. So, I bought some huge 1/2" diameter grade-8 zinc coated bolts and welded them to a 1/8" plate that lives on each side of the sheetmetal floor in the driver's compartment. Drilled holes through the floor, the oem subframe rails (and my passenger side home made angle-iron rail) and used three bolts per side to locate and hold my transmission crossmember up. Also, not pictured (but already drilled and mocked up) will be several long 3/8" bolts that go horizontally through the crossmember's outer mounts, through the car's frame rails, and through the mounting pad of the S&W subframe connector too. These will secure the trans mount laterally. This thing is not going anywhere, and it is robust. I will have to weigh it compared to the oem unit, but it had to be done with heavy duty strength in mind.


this is a view looking backwards to teh rear of the car along the driver's side, obviously fuel lines and all that are just loosely pulled aside still

looking backwards on the car along passenger side trans tunnel. don't mind the sloppy seam sealer.

looking up from the passenger side :

If my measurements are correct, the way I built the "arches" in the trans crossmember, it will allow me to bring up my 3" collector pipes about 1 5/8" higher than where the would have lived if I let them hang under the frame and oem trans crossmember. They will not be the lowest item on the car. So that's exactly what I was gong for, primarily to save ground clearance.
- this all took a ton of work, and I hope it all works out. Seems ultra strong here sitting in the car, but the true test will be when the car is driving/racing around. I still need to cut/modify the crossmember that holds the torque arm and rebuild some type of driveshaft safety loop, so that will be soon. However, I am now getting to the point where I can actually start to work on the exhaust components. First will be putting V-bands on the header's and then working out pie cuts, pipe, and flex-pipe to get to the flowmaster 3"to4" merge collector.
On another note, I did get the pulleys and diff cover back form the powdercoating guy, with tip, just a tad over $100. Installed the diff cover but have yet to install the pulleys. the diff cover comes from moser with a slightly textured aluminum finish, so the powsercoating is not glass smooth, but it turned out great. I had him mask off and keep the Moser logo on there too.

